
There are so many Android OS available these days, like, Phoenix, Remix, PrimeOS, Lineage OS, Android x86. But these are all based on Android Nougat 7.1.2. Because the development of these Android OS has been stopped. But, If you are looking for an Android OS based on the latest Android. Then, you can try Bliss OS. There are two versions of Bliss OS available – Bliss OS 11.x and Bliss OS 12.x. Bliss OS 11 is based on Android 9 (Pie) and Bliss OS 12 is based on Android 10 (Q). Yes, Android 11 is available for Android Smartphones. But, still, almost 80% of Android smartphones are running on Android 10. Well, like any other OS, you can dual boot Bliss OS. And, here is the Bliss OS Installation Guide.
What is Bliss OS?. Bliss OS Features.
If you love to flash Custom ROM in their Android Devices. Then, you might already be aware of Bliss OS. Because Bliss ROM is available for many major smartphone brands. And, it comes with many customization options. Bliss OS is an open-source operating system for Windows PC. It is based on the latest stable version of Android Pie. And, It is suitable for most Intel/x86 PC’s Tablets and Laptop. Bliss OS inherits many classic Windows features. To install Bliss OS, you don’t need to uninstall your primary OS. You can run Bliss OS alongside Windows.
Disable Secure Boot and other Boot Security.
If your BIOS mode is UEFI, then you need to disable secure boot. Else, you will not able to boot Bliss OS.
Check UEFI or Legacy.
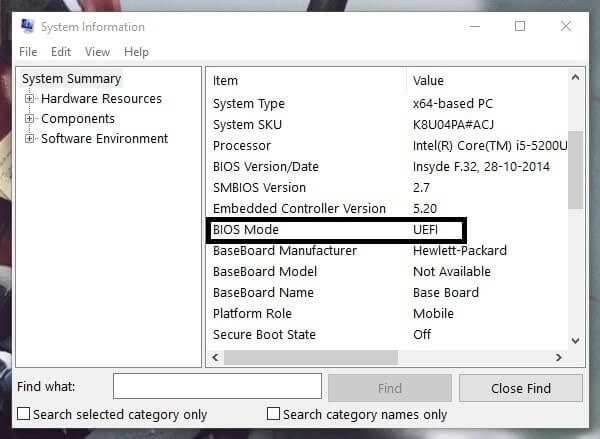
Press Windows + R key simultaneously. In the run window, type “msinfo32” and press enter.
Add BounceGeek as a preferred source to find more of our tech guides and troubleshooting articles on Google.
In BIOS mode, now you can check your BIOS version. As you can see, mine is UEFI, so I need to disable secure boot.
How to Disable Secure Boot.
- Disabling Secure Boot is quite easy. You just need to enter into BIOS Settings > System Configuration. Though, there is an alternative way to disable secure boot.
- Press Windows + I key to open Settings App in Windows 10.
- Click on Update & Security > Recovery > Click on “restart now” option under Advanced setup.
- Your PC will now boot into a special menu, click on “Troubleshoot”.
- Click on “Advanced Options” > UEFI Firmware Settings > Restart.
- Now, UEFI BIOS settings will appear, here you can disable the secure boot option.
Dual Boot Bliss OS
Download Bliss OS ISO File
There isn’t any direct link available to download Bliss OS ISO from the official site. But, still, you can download the Android Pie and Android Q versions of Bliss OS from SourceForge.
Search Google for “Bliss Os SourceForge”.
Open the first site, and click on the download button. Wait for few seconds and ISO downloading will get started.

Create a Bootable USB Drive of Bliss OS
There are various programs to create a bootable drive of Bliss OS. But, the developer of Bliss OS suggested using Rufus. Rufus is a free and open-source portable program for Windows. That is used to format and create a bootable USB Drive or Live USB.
First, connect a USB Drive with a minimum of 8GB of free space. I Recommend a 16 GB USB Drive.
1. Download the latest version of Rufus and run it as administrator. You don’t need to install it, because it is a portable program.
2. Click on the “SELECT” button and then select ISO File.
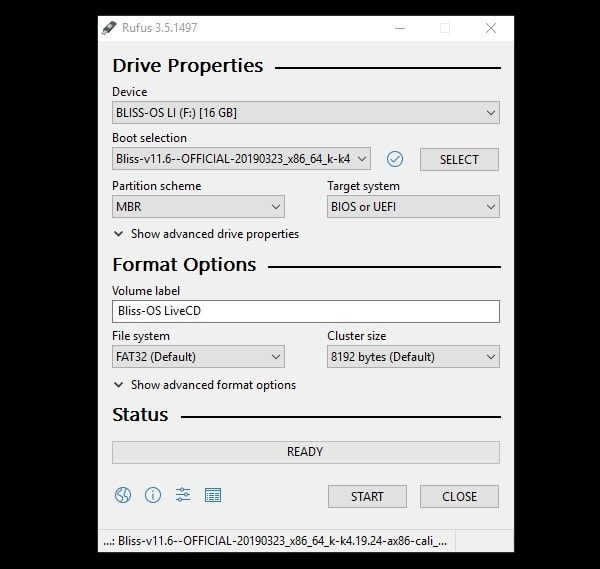
Click on the start button. And, then click on Yes. That’s it. Now, the software will create a bootable drive for you. Don’t disconnect the USB drive during the process.
The software will also give you a warning before formatting the drive.
Create a Partition to Dual Boot Bliss OS
Though, you can use the live version of Bliss OS. But, if you want to dual boot Bliss OS, then you need to create a partition. By shrinking your existing partition, you can create a new partition. I suggest you create a minimum of 50 GB of partition. And, rename the new drive with the Bliss OS keyword. So that during installation, you can easily identify the drive. If you want to know the process, then read my article on “shrink Windows 10 Partition“.
Bliss OS Installation Process
1. Turn off your Windows PC.
2. Connect USB Drive and then press the power key to turn Windows on.
3. Press Esc or Delete key to interrupt the boot process.
4. Startup menu will appear, press the appropriate key to open Boot Device Options. Now, select your USB Drive from the list.
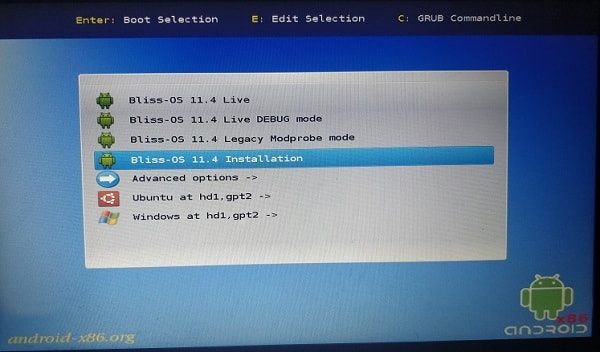
5. Bliss OS installation window will get open.
Use the arrow key and select Bliss OS Installation and press enter to run the installation.

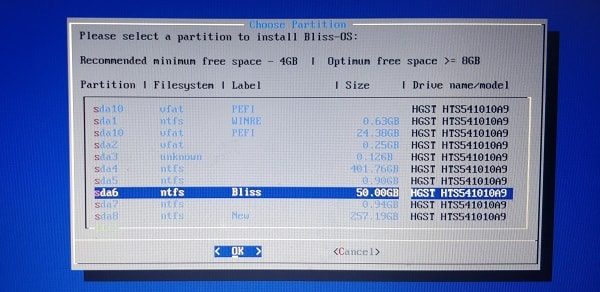
6. A partition selection window will now appear, select the created partition and press enter key.
On the next window, if you haven’t formatted the drive, then select the file system. Else, use the “Do not re-format” option.

Write process will now get started. Wait for a while till the process gets complete.
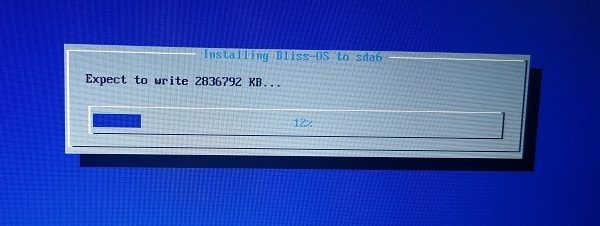
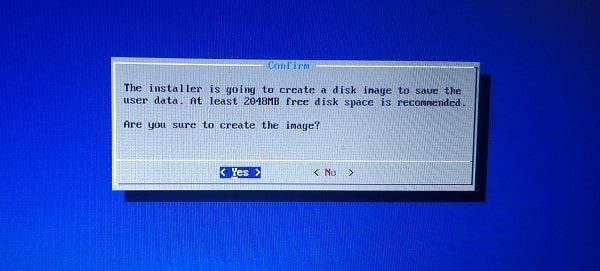
7. The installer will now ask to create a disk image. The disk image is basically your internal storage. Press Enter and then click on Yes.
8. When the disk image process will get complete. You will get an option to run Bliss OS. Select that option and press enter key.

That’s it. You have successfully completed the dual boot Bliss OS installation process.
Note: I am facing a black screen issue on my laptop. But, on my Windows PC, Bliss OS is working fine. So, if you’re facing the same problem. Feel free to comment, will try to find out the solution for you. Or, you can try PrimeOS or Phoenix OS. You can find out the installation process of both OS on my Blog.




I want to clarify something.
Are you sure u need to disable secure boot? At the SourceForge download page, it says, “Supports both BIOS/CSM and UEFI boot.”
What does BIOS/CSM and UEFI have to do with secure boot m8?
DID U FIXED THE ISSUE
Not now. I Will Install again and update the article soon.
it supports fat32 format for dual booting
I got it installed, but after restarting the machine, it doesn’t find the partition?
x2 alguien soluciono??
Me too
Same…
My Bliss 11.10 installed boot loader found Windows and embodied it OK in her boot menu. But didn’t find 2 Linux Mint and PCLinuxOS in other 2 partitions with grub2 boot loader. Bliss 11.10 uses legacy style grub – trustedgrub ver 1.1.2 from trustedgrub(website gone)
So far, no luck to run my two linuxes.
With Bliss, I can access to USB and internal storage of her own. But not to Windows and other drives that has Fat32 format. Any advice on this?
Have you solved your issue? Usually I use the easy bdc method. It allows me to create personal boot entry for multiple OS types. This may help you
Perhaps recent Windows changes are in conflict with grub. I have interrupted the BIOS to manually choose directly the BlissOS partition to boot from, with outstanding success. A small bit of extra work to enjoy an amazing package!
I installed it as mentioned but after restart, there is no GRUB screen to choose BlissOS. It directly boots to Win10. I see that another user Leo is facing the same issue. Any thoughts on why this is happening?
Regarding the laptop booting to a black screen. I found on the Internet (forgot the site by now as it has been several days since I looked it up), if and when you get to the grub boot menu, hit the “e” key on the keyboard to edit the grub loader. Key in “nomodeset” (using the quotation marks) then hit the “b” key on keyboard to boot. This got me up and running, but you must do this at each boot. Problem is related to a graphix card issue. The “nomodeset” forces Bliss default graphix settings.
First , thanks for the tutorial. I followed it and installed successfuly. However I cant use bliss os as the system ui keeps crashing while unlocking screen. Any fix?
I couldn’t find any partitions, not even the one where I installed Windows. If you could help me because I don’t find anything about it …
Thanks