
There are many Android OS available for PC, like Lineage OS, Prime OS, Bliss OS, Remix OS, and few others. But, Phoenix OS is one of the oldest Android OS available for Windows and Mac. The best thing is you can dual boot Phoenix OS on your Windows PC, without affecting the original document system. The latest version of Phoenix OS is based on Android 7.1, known as nougat. There is an older version also available to download, which was based on Android 5.1 (Lollipop ). Yes, Google is already started working on Android 12. But, as of now development of this OS has been stopped. But, still, the source code of it available on Github.
Well, if you have an old laptop, in which Windows doesn’t work flawlessly. Then, you can try to install Phoenix OS on the old laptop. So, here is the Installation guide for Phoenix OS.
There are two ways to install Phoenix OS, one completely removes your windows and install Phoenix OS. But, I will not recommend that no one wants to lose their important data. So follow this step-by-step guide to Dual Boot Phoenix OS with Windows.
What is Phoenix OS.? Phoenix OS features.
Phoenix OS is an operating system for Windows PC based on the Android 7.1 Nougat. It is suitable for tablets, desktops, computers, and other large-screen devices. It inherits many features of classic windows computer like –
- Start Menu. – Like windows, you can able to find out start button in Phoenix OS, which helps you start applications.
- Multiple Windows Design. – It offers the design of the same window that is available in mac and windows. You can resize and move windows, title bar also available.
- File Manager. – It supports classic file manager and LAN access, you can drag and drop the file and access local computer files.
- Notification center and browser. – Like windows 10 you can find the notification center. Which allows you to change quick settings like WiFi, Bluetooth, screen rotation, and a few others. Instead of the Android browser, you can find Stardust browser but you can download chrome also.
Dual Boot Phoenix OS and Windows 10
Download Phoenix OS – Phoenix OS Download Links
1. The official site of Phoenix OS is currently isn’t loading because of the HTTPS certificate issue. Well, by replacing HTTP with the HTTPS in Phoneix OS site URL, you can open it. I have created an HTTPS link.
2. Once the website gets loads, you will find two PhoenixOS installers. So, If you’re using the 64-bit operating system then you can download PhoenixOSInstaller-v3.6.1 (Based on Android7.1).
Or, if your system type is 32-bit then you can download PhoenixOSInstaller-v1.6.1 (Based on Android5.1).
Add BounceGeek as a preferred source to find more of our tech guides and troubleshooting articles on Google.
Download Exe Installer from MEGA Download Link. Because Google drive will show you an error.

How to Check System Type?.
1. To check the system type in Windows 10 OS. First, press the Windows + I key to open the Settings App.
2. Click on System > About. Here in the device specification, you can check your system type.

If you’re using an older version of Windows, then, right-click on My Computer and then click on Properties.
Note: Don’t download the ISO file, because installing Phoneix OS through the ISO file process is a little bit complicated. So for hassle-free installation download Exe Installer.
Create a Partition to Dual Boot Phoenix OS
There are dozens of Partition manager software available on the internet, but you don’t need to download any third-party software. Windows comes with the inbuilt option known as Shrink Volume.
Step: 1 If you’re using Windows 10 then Right-click on the start button and then choose disk management.
Step: 2 A window will open, Select the Drive in which windows 10 is Installed & Right Click on it, and you can see the Shrink Volume Option just Click on it. (you can choose other drives too If you don’t have enough space in the C drive.)
Step: 3 Enter the amount of space to shrink the field enter 20000. (which is around 20GB) and then hit the shrink button. The process will take around 5 – 10 minutes to complete, don’t shut down the computer because the process will run in the background. (I have created a 50 GB Partition for the OS Installation.)
Right-click on the created partition and then choose to create the new volume, complete the wizard by clicking on next and format your drive using it.
If you’re facing any issue while shrinking volume then follows this Guide. – Shrink Windows 10 Partition and make space for Linux.
Phoenix OS Latest Installation Guide
There are two ways to run Phoneix OS on your Windows PC, You can either use a USB Storage Drive or, you can Install Phoenix OS on the created partition. If you don’t have space to shrink then USB Drive is the best option.
Step 1: First, Right-click on the Phoenix OS Installer file that you have downloaded and click on “Run as administrator”.

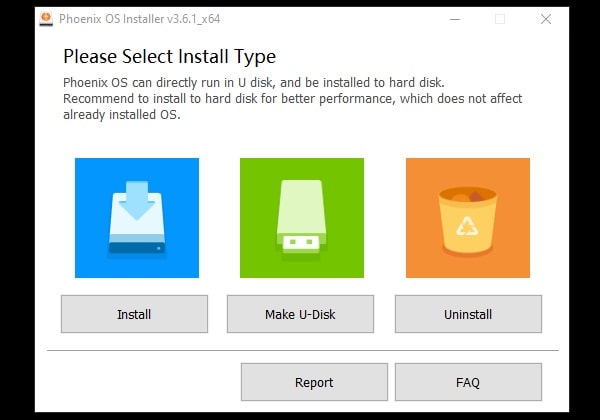
Phoenix OS Setup wizard will get open, and, you’ll get three options.
Alternate Method – Make U-Disk – If you want to install it on USB Drive then choose to Make U-Disk and then select Drive and choose Write option. After that simply reboot the system and choose Phoenix OS from the boot menu.
Step 2: If you want to install Phoenix OS on your hard drive, then, click on the Install button. (Yes, you can uninstall Phoenix OS from your hard drive later easily.)
Install Phoenix OS to Hard Drive, Window will now appear. Select the hard drive partition that you’ve created for Phoenix OS. Click on Next.

Important: Be careful while selecting the drive, don’t select Windows Drive. Also, make sure there isn’t any data in the selected drive.
Step 3: Now, the setup will ask you to select a data size to create a data image for OS. You can select the data size as per your partition size. I have created a 50 GB partition, so here I am selecting the 32 GB option. You can comment down below if you still have confusion about what to select.
Click on install.

Step 4: Now, Just Wait – The installation process will now take almost 10-20 minutes depending on your computer performance.

And whenever the process will get completed you will get the “Phoenix OS successfully installed” message.
Step 5: Now, to boot into Phoneix OS, click on the Reboot Now option.

You”ll also notice a “start Phoenix OS” icon on your desktop. This is also to boot into Phoneix OS.


Step 6: Once, Windows get a restart, you will get two options. Yes, you have successfully dual-booted Windows and Phoenix OS.
Windows
Phoenix OS
Use Arrow and Enter key to select Phoneix OS.

Your PC will now detect Phoenix OS and the System Intialiazing process will get started.

Step 7: Once the installation process gets completed, the welcome screen will appear. Select English language and click on Next.

Next, you have to agree to the User License Agreement.
Step 8: After that, connect to your WiFi network and click on next.

Phoenix OS will now ask to create a User Account. Enter your name and click on Finish.

That’s it, Phoneix OS will now get open. Enjoy Android OS on your old Computer.
Fix Verification Failed (15) Access denied error.
If you’re using an HP laptop then you’ll face Verification Failed (15) Access denied error – To fix this error go to Bios setting and then disable Secure Boot. After that restart your PC and press Esc and delete to enter into the BIOS setup and choose Phoenix OS.
Wait for 5 minutes Phoenix OS will boot up, Now select English and set up WiFI and user Info, and Done. Enjoy Android Nougat on your Windows PC, If you want to exit then simply shut down Phoenix OS and then on PC to enter into Windows.
Uninstall Phoenix OS
Want to remove Phoenix OS completely from your Hard Disk.? Here is a quick guide –
Run Phoenix OS Installer and then choose Uninstall Button. It will uninstall Phoenix OS within a Minute. Or if you installed on USB Drive then go to My computer > Right-click on USB Drive and then Choose Format option. It will remove all Phoenix OS data from your USB Drive. Personally, I will suggest you use Rufus Tool to create a non-bootable drive. Also, If you have an ISO file of Phoenix OS then use the Rufus tool to create a Bootable USB of Phoenix OS.




no reboot option.a had installed it for many times.
help me…………..
You need to restart (reboot) it manually. And then from boot menu, you can choose phoenix OS. (Make sure you have selected right device in boot manager)
Hello, when I connect WiFi, the system closes and I do not know how to solve it.
Is WiFi works fine on your Windows PC?.
It could be a bug in the latest version of Phoenix OS. Or, maybe the issue is with hardware.
Things that you can do.
Re-Install Phoenix OS. (If you’re using the USB drive, then try to install it on Hard Disk.)
would that be an issue if I installed it on C:
Don’t try to install it on C Drive, If windows are installed in it. Use shrink option to create a new drive. (Check Disk Management.)
There is a erroe 18 while booting i am unable to do anything plzz help
I also get error 18 when trying to boot from USB.
This question hasn’t been addressed yet (Jan 2022).
I have successfully installed phoenix OS(dual boot with win7) but when try to boot it shows a screen reads “ANDROID x86_64 # _” .
I don’t know what to do next please guide me.
Actually, you can’t do anything about it. Because, after that screen, Phoenix OS get starts booting.
If you have installed phoenix OS on the hard drive. Then, I suggest you uninstall it. And then create a bootable Pendrive using U-Disk option.
PS – If you only want to install it on the hard disk. Then, wait I will provide you a working solution soon.
Is there a fix already?
Man i need the solution for this:
have successfully installed phoenix OS(dual boot with win7) but when try to boot it shows a screen reads “ANDROID x86_64 # _” .
I don’t know what to do next please guide me.
If i install phoneix in my windows 7 i will lost my personel file too
Use Pen Drive and dual boot. Don’t replace Windows 7. You will not lose anything then.
How can i dual boot phoenix os on mac ? please help me
The hard-drive installation involves partition management, which is always risky. I suggest doing this only if you already have a partition manager, like EaseUS, DiskGenius, MiniTool or Tenorshare. They all have free trial versions, but paid versions are always better. The free, open source Gparted Live boot disk (usb or CD) is even better. Of course, nearly all linux users are familiar with dual booting and partition management. This article also doesn’t make clear if the new partition is formatted to NTFS. I’m going to assume so, because if it’s not (and not FAT or FAT32) it won’t show up at all in Windows, not as Drive: I, or anything else. Most Android devices use YAFFS or ext4 (popular for modern linux) or possibly the outdated ext3. Using a filesystem meant for Windows already presents lots of possibilities for problems. It should be possible to run this on Macs, although they have yet again different filesystems, different partition managers and different methods of dual booting. Perhaps Boot Camp would help.
for the first time after the installation it came but after that i cant find any menu foitr the os selection it automatically come into my windows 8.1 os.if i click f12 also the os menu is not occuring.please reply
Have you installed OS in hard disk or using USB Drive?. Because, if you have created bootable USB drive. Then, you have to stay connected with it. And, need to select USB drive as first in boot device order. (In BIOS settings.)
Or, if you have installed Phoenix OS in hard drive. Then, please tell me your laptop manufacturer name. Or, you can search for “os selection screen not coming”.
Can I go back to windows ? If yes then how..
S when u on ur PC it shows 2 os in that u select ur windows
Or else while starting ur PC press f8 to boot
In boot menu u select ur os
I installed 1st on 18 gb partition from phronixos.exe, but on boot after selecting pheonixos stuck on grub….dont know what command to be made.
Then i used easyBCD tool to remove pheonix entry from boot and added again fron pheonix.iso.
It solved grub stucking but now it gives error no 18. NTFS cant be mounted. Both NTFS and FAT32 partition tried.
Then Try EXT4
ADMIN
If anyone facing problem during installation of Phoenix OS. I suggest you to try new PrimeOS. Dual Boot PrimeOS guide added.
Thanks sir for this article. I want to know if am using legecy-Bios how to go to switch another operating system. I currently have Windows 10 and pheonix os on different partitions of hard disk.
Go to BIOS settings > boot. And, from there you can turn off legacy mode. And, can enable UEFI boot mode.
There are already tons of articles available about this process. You can search. If still not able to find out right way to do so. Then, feel free to Comment.
I have installed phoenix 2 times and via u disk 3 time it installs succesfully and after install phoenix os runs but after i reboot my pc there no boot option for phoenix os and also not any entry but it installed in the drive ?? plz help
Search on Google – how to open boot menu in Windows 10.
You will find out multiple ways to access the boot menu (all installed OS). And, In Windows, you can’t see, in which drive phoenix OS is installed. It’s hidden, the same problem I had faced. Though if you want, you can try PrimeOS (Check my article on it.), if Phoenix OS is causing problems.
platform MSFT0101:00 failed to claim resource 1
acpi MSFT0101:00: platform device creation failed: -16
Using lenevo IdeaPad 320
This is the exact problem I’m facing at the time of booting..
Please anyone help and tell me why this
And solution
Thank you…😊
i make that all but my pc said detecting pheonix os……………………………………………….(infinitedot) what should i do….???
OS isn’t installed properly. Also, check in which drive, you have installed it. And, if after reinstalling problem doesn’t get resolved. Then, try PrimeOS. Check my article on it.
I installed Phoenix os in a :\p disk when I restart my pc and select Phoenix os it shows Detecting Phoenix os. and restarts again to boot menu.
please try to solve my problem.
my pc spcs:
3 GB ram
GPU:Intel chipset
windows 7
I have 3 drives C,D and E. The windows is installed on C drive so can I install phoenix os on E drive? without creating a new partition?
Yes, you can, just make sure there aren’t any data stored in that drive.